Upstart Job to Send Email During Boot

Since Ubuntu makes use of Upstart, I decided to take some time to figure out how to write a job to send a notification email every time one of my servers reboots. The Upstart job is below and is stored in /etc/init/boot-notify.conf.

# boot-notify - sends an email notification upon boot

description "sends an email notification upon boot"

start on started rc-sysinit

task
exec echo "$( hostname -f ) booted on $( date )" | mail -s "$( hostname -f ) booted" root

Here’s a brief explanation: The line start on started rc-sysinit says this job can’t run until after rc-sysinit has completed. I use Postfix, which still uses the init daemon. Therefore, it was easiest to send an email after the init daemon gets done running its jobs including starting Postfix. The task line simply says this is a short running process that doesn’t continue running the way a service would. The last line is the command to run identified by exec.

Barracuda Email Security Service Review

I used the Barracuda Email Security Service for the majority of the month of October 2012 to filter spam for our secondary domain name. During that period of time, we received almost 11,600 emails. Roughly 2,000 were allowed through; 8,600 were blocked, and 1,000 were quarantined. Of the 2,000 allowed, I estimate 600 of them were actually spam.

Technical Support

All calls to Barracuda technical support are routed through receptionists that only take your information and create tickets. I first called one morning and didn’t get a call back until 5:30 pm that evening after I had left for the day. When I called in the next morning to speak with a technician, I was put back in the queue and did not receiving a call until the following morning. The total time to begin addressing my issue was close to 48 hours.

Spam Filtering

I regularly reviewed the last block of 50 emails that Barracuda allowed to pass through. Of those 50, typically 15 (30%) were missed spam. (The number of missed spam ranged from 7 to 27 out of the 50.) Many of the subjects of the messages allowed through contained words that were obviously spam (think improving oneself in bed). Even after ratcheting up all of the custom scoring settings, too many messages were still getting through. To their credit, I was not able to find any false positives. All messages marked as spam were definitely spam.

The Barracuda ESS does provide a mechanism to mark messages as spam. However, it provides no useful feedback to indicate that the message is now spam. Therefore, you could easily mark the same message as spam 3 or 4 times if you
reviewed the same block of emails more than once.

Setting up custom policies to filter messages was rather limited. My only options were to enter keywords and then specify if messages matching those criteria should be allowed, blocked, or quarantined. I would have expected some fuzzy logic to handle a phrase like “orders of magnitude,” which could refer to effect of the male enhancement pills or just how off the sales projections were.

Virus Filtering

It is unclear what kind of virus scanning the Barracuda ESS is performing as it allowed through at least two zip archives containing suspicious executable applications masquerading as DHL shipment invoices.

LDAP Synchronization

LDAP integration from our Active Directory domain to the Barracuda ESS worked reasonably well. I created a non-privileged user on our domain for Barracuda to use, opened a hole in our firewall, and specified the base DN for synchronization. Unfortunately, there was no way to filter our AD contacts that did not have SAV email addresses. The Barracuda ESS also pulled in all email addresses including our internal domain savtrans.local which is not actually used for email. A simple filter could have easily prevented loading of this bogus information.

If I had chosen not to use LDAP synchronization with the Barracuda Email Security Service, all of my users would have need to verify their accounts and all corresponding email addresses one by one. I believe an administrator should have the ability to load aliases without having to manually verify each one.

Summary

While the Barracuda Email Security Service is priced below the competition, I believe the competition offers a superior product. Their major outage on October 22, 2012 brought out a lot of complaints about the service in their forum. I do believe they have now stepped up their game, especially in the communication department, but I still can’t recommend them as a service that does a good job of filtering spam.
Peplink Balance 380 Review

Last year, we purchased a pair of Peplink Balance 380s for our office. Their ability to load balance across multiple Internet connections including using a cellular USB dongle as a backup connection was very attractive. I received the pair of devices and without too much difficulty got them connected and routing traffic in and out of the blocks of IP addresses we have with two Internet service providers.

I tested the load balancing/failover by pulling the plug of one of our Internet connections. The Peplink router quickly moved all traffic to the remaining connection. Over the last year, none of our employees have ever even noticed when one of our connections has gone down.

Several months ago, I tested the reason we purchased a pair of them. Once configured in high availability mode, the secondary router is supposed to take over for the primary upon failure. I simulated this by pulling the plug on the primary while pinging the virtual gateway IP address and an IP address outside of our network. The results were impressive:

  • 7 seconds total for the secondary router to re-establish internal connectivity.
  • 13 seconds total for the secondary router to re-establish Internet connectivity.

The primary router was configured to re-establish its primary role upon rebooting. I plugged it back in, and the results were similarly impressive:

  • 2 seconds for the primary router to re-establish internal connectivity.
  • 8 seconds for the primary router to re-establish Internet connectivity.

While purchasing two of these routers cost quite a bit more than just purchasing one, the pair allows us to sleep soundly at night knowing that if one fails, our Internet connectivity will remain intact and business can continue normally while we replace the faulty router.

Dell Latitute D620 Laptop Wireless and Ubuntu 11.10

After installing Ubuntu 11.04 on my Dell D620, I began noticing some wireless connectivity issues. This included delays or problems connecting to my home wireless network, increased latencies particularly when transferring files, and occasional disconnects. After upgrading to Ubuntu 11.10, the problems got worse. Doing some searching online revealed some possible solutions.

Installing the “b43-fwcutter” and “firmware-b43-installer” packages and rebooting the laptop is what ultimately worked for me.

aptitude install --quiet --assume-yes b43-fwcutter firmware-b43-installer

EVGA 680i SLI Motherboard and Ubuntu

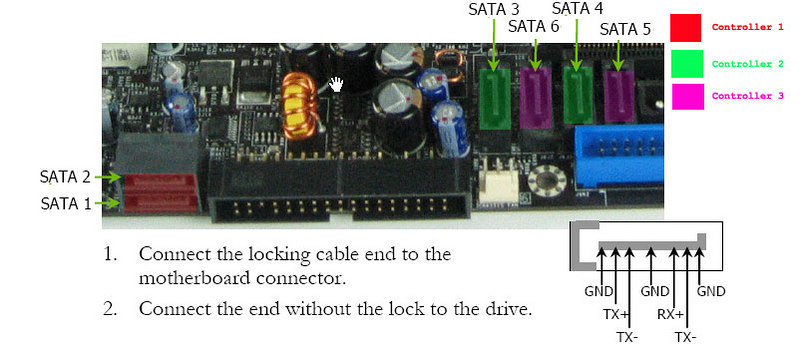
A couple years ago, I built two servers and used EVGA 680i SLI motherboards. I chose that particular board because it had two Ethernet jacks and six SATA ports. At the time, I also purchased three SATA hard drives and a SATA optical drive. I plugged the four devices, installed Ubuntu 8.04 LTS and thought nothing of it. When I updated one of my servers to 8.10, I noticed that one of the newer kernel versions didn’t seem compatible with the drive configuration. I used an older kernel version, and eventually, I replaced SATA cables and switched the active SATA ports around. Eventually, it began working correctly on the latest kernel. I upgraded to 10.04 LTS, and things continued without incident.

However, a couple days ago when I decided to install a fourth hard drive, I again ran into the same problem. I did some searching and discovered some possible bugs. One of the solutions is to build a custom kernel. I opted to simply shuffle the SATA cables around again and moved all four hard drives to the four ports facing upward (ports 3-6) on the motherboard. I moved the optical drive to one of the two ports facing outward (port 1) on the motherboard.

EVGA 680i SATA Ports

Since the problem occurs during the boot process, and only seems to affect ports 1-2, all four hard drives function properly, and I can still boot from an optical disc or mount a disc once the computer has finished booting. Unfortunately, this solution makes adding a fifth (or sixth) hard drive impossible, but it’s a solution I am willing to live with until the problem is resolved (if it is resolved).

Fix ISP DNS Hijacking with DD-WRT

Ars Technica recently wrote up an article ISPs hijacking DNS requests to watch web searches. A couple years ago, I discovered that any time that I punched in an invalid domain name, instead of telling me the domain name did not exist, I was redirected to a search page. The search page had an opt out feature, but it reset after a few hours. I wrote a script to automatically opt myself out every few hours, but it was ineffective. When I called CenturyLink (my ISP) about this problem, they first denied it. After arguing with the representative for a while, he eventually informed me that this was how the feature was supposed to work. I asked him how that could be useful if the opt out really wasn’t an opt out. He didn’t have an answer. Eventually I opted to use alternative DNS. However, one solution for those of us running DD-WRT on our routers is to add additional DNSMasq options. While OpenDNS does honor opt outs, I still add the IP addresses they use to my configuration.

Before adding anything, pinging an invalid domain shows:

ping garbage.invalidtld
PING garbage.invalidtld (67.215.65.132) 56(84) bytes of data.
64 bytes from hit-nxdomain.opendns.com (67.215.65.132): icmp_req=1 ttl=56 time=54.4 ms

I went into the Services page of DD-WRT and added the following to the “Additional DNSMasq Options” section:

bogus-nxdomain=67.215.65.132
bogus-nxdomain=184.106.31.182

Now the same command returns the proper response:

ping garbage.invalidtld
ping: unknown host garbage.invalidtld

I could have applied the same method to filter CenturyLink’s DNS responses, but I have been happier with OpenDNS and decided not to switch back.

Google CDN URL for Dojo Changes

As Dojo suggests on their website, I opted to use Google’s copy of the Dojo Toolkit:

<script src="http://ajax.googleapis.com/ajax/libs/dojo/1.6/dojo/dojo.xd.js" type="text/javascript"></script>

This worked very well until today. After doing some digging, I realized that according to Google’s documentation, the URL has changed:

<script src="http://ajax.googleapis.com/ajax/libs/dojo/1.6.0/dojo/dojo.xd.js" type="text/javascript"></script>

I have to imagine that this will be bad for a lot of websites, but at least the solution is fairly simple.

Spawn a Styled xterm into Home and Disown It

First, I set up the styling (no scrollbar, font, font size, background, and foreground colors):

xterm +sb -fa monaco -fs 10 -bg black -fg white

Next, I redirected the output and backgrounded the process:

xterm +sb -fa monaco -fs 10 -bg black -fg white > /dev/null 2>&1 &

This worked well for quite a while, but when I spawn a shell in an arbitrary directory, I wanted my shell to start in home so I added:

eval $( cd ; xterm +sb -fa monaco -fs 10 -bg black -fg white > /dev/null 2>&1 & )

Finally, I wanted to fully disown the new xterm from the shell I spawned it from. Therefore, my .bash_aliases file now has:

alias term='eval $( cd ; xterm +sb -fa monaco -fs 10 -bg black -fg white > /dev/null 2>&1 & disown %1 )'

Now I can cleanly spawn a new terminal that sends no output to the existing shell.

How Nvidia Took the Fun Out of Dual Screen Xorg Configuration

Dual screen configuration used to be quite the hassle on Linux. However, Nvidia has made it incredibly easy with their nvidia-xconfig command. The “–no-logo” argument eliminates the Nvidia logo when X starts, and “–twinview” enables the second display.

nvidia-xconfig --no-logo --twinview

Now I can configure my systems for dual displays during an Ubuntu installation without the need for reinstalling an old hacked together xorg.conf file.